In this article, you will learn about thermostat wiring and how they work. We have formulated this in depth guide to answer majority of your questions related to thermostat wiring.
A thermostat is an essential component of modern heating and cooling systems. It is a device that controls the temperature of a room or building by switching the heating or cooling system on or off.
The wiring of a thermostat plays a crucial role in ensuring that the device functions efficiently. The wiring connects the thermostat to the heating and cooling equipment, allowing it to communicate with the system and control the temperature.
There are several different types of thermostats available, each with different wiring requirements.
When it comes to wiring a thermostat, some only require a few wires while others may require more complex wiring to support advanced features such as programmable settings, remote control, and Wi-Fi connectivity.
Understanding how thermostat wiring works is important for anyone who wants to install or repair a heating or cooling system.
Thermostat wiring works by connecting the thermostat to the heating and cooling system. The wiring typically consists of several colored wires that are connected to the corresponding terminals on the thermostat and the equipment.
There are several common types of thermostats and each type of thermostat requires a specific type of wiring, but first let us tell you about the colors of the wires and their purposes.
Thermostat Wiring Color Code

The color of the wires on a thermostat typically corresponds to specific functions or terminals on the thermostat. Here are some of the most common wire color and their corresponding functions:
Red: This wire is mainly the power wire that is connected to the ‘R’ terminal of the thermostat. It’s job is to provide the thermostat with power.
White: This wire is known as the heating wire that is connected to the ‘W’ terminal of the thermostat. Depending on the temperature set-point of the thermostat, it sends a signal to the heating system to turn on or off.
Green: This wire is usually the fan wire and is connected to the ‘G’ terminal. It sends a signal to the fan to turn on or off, depending on the thermostat setting.
Yellow: This wire is usually the cooling wire and is connected to the ‘Y’ terminal. It sends a signal to the cooling system to turn on or off, depending on the temperature setting on the thermostat.
Blue or Black: These colors are sometimes used for additional functions such as controlling a humidifier or air purifier.
It’s important to note that the specific colors and functions of the wires can vary depending on the manufacturer and type of thermostat.
It is always best to consult the wiring diagram or instructions provided with your specific thermostat to determine the correct wire colors and functions.
Thermostat Wiring
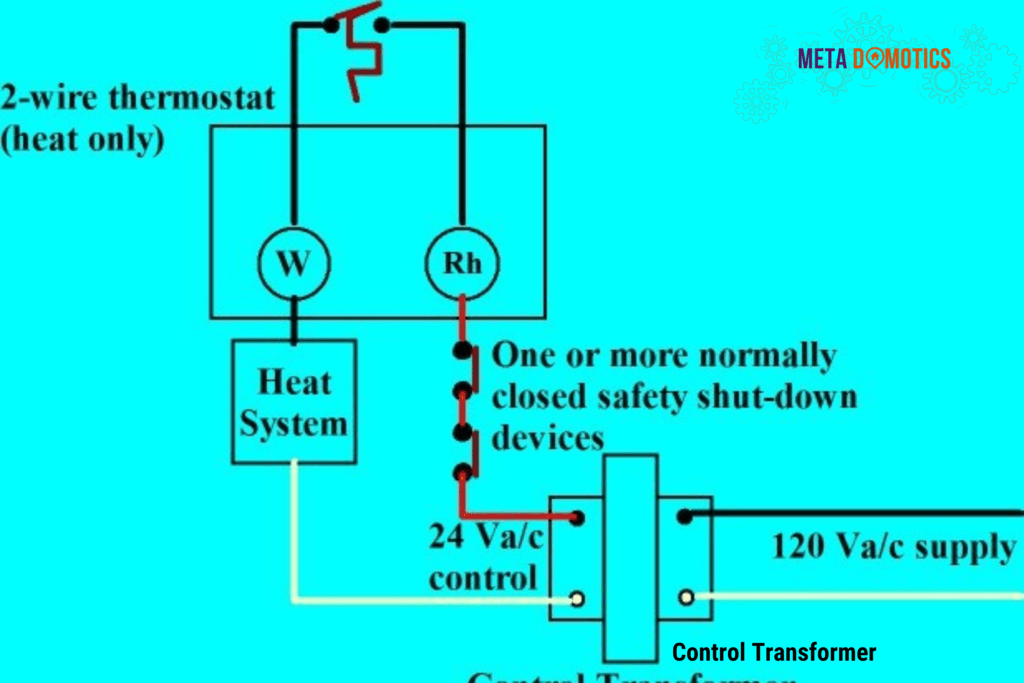
The simplest type of thermostat, a manual thermostat (consisting of a mercury filled ball connected to a coiled bi-metallic strip), requires only two wires.
One wire connects to the ‘R’ terminal, which provides power to the thermostat, and the other wire connects to the ‘W’ terminal, which regulates the heating system. When the thermostat is turned on, it sends a signal to the heating system to turn on.

The ‘R’ wire is typically connected to the power supply of the heating or cooling system. It is the “hot” wire that carries the electrical current to the system.
When the thermostat detects that the temperature in the room has dropped below the desired level, it completes the circuit between the ‘R’ and ‘W’ wires, which sends a signal to the heating or cooling system to turn on.
The ‘W’ wire is typically connected to the heating or cooling systems’ control board and is the wire that carries the signal to turn on or off the system.
When the thermostat completes the circuit between the ‘R’ and ‘W’ wires, it sends a signal to the control board to turn on the heating or cooling system.
The control board then sends a signal to the system to turn on the fan or blower, which circulates the heated or cooled air throughout the room.
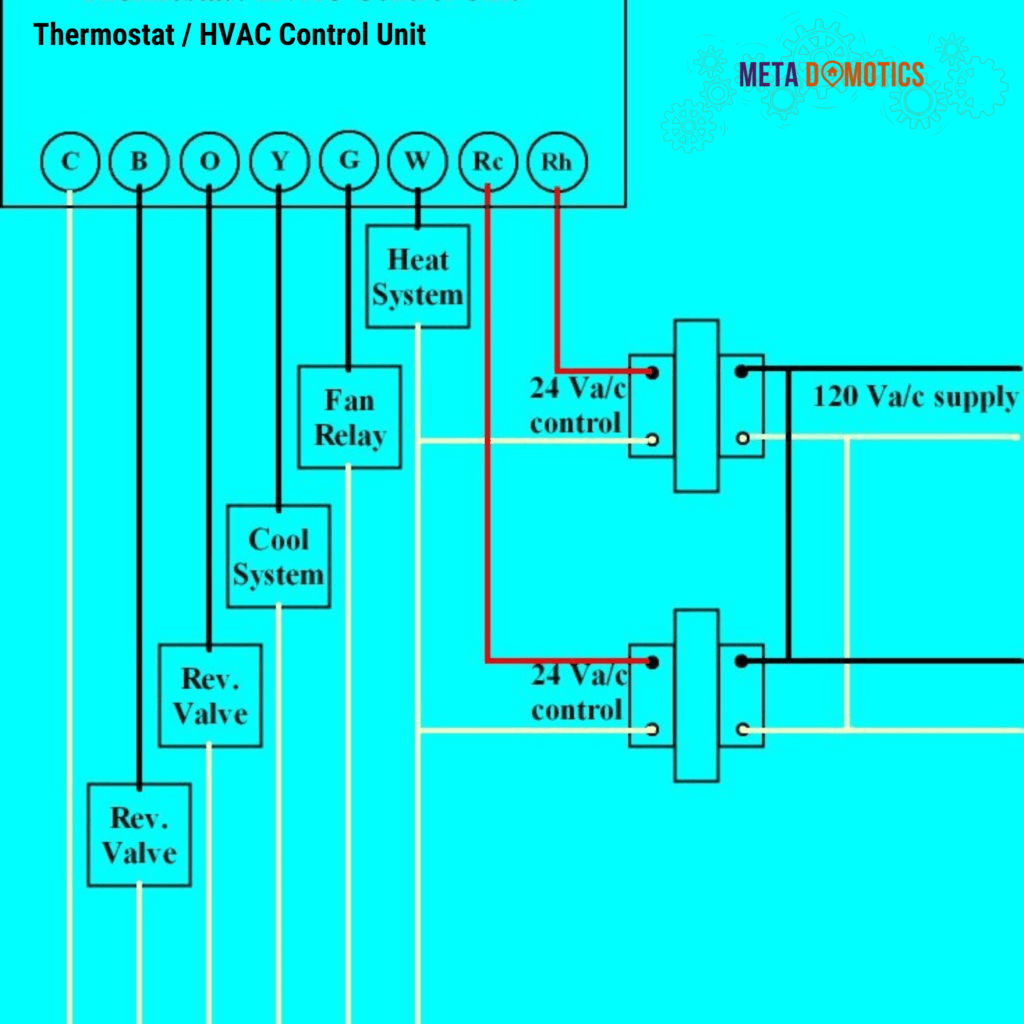
Programmable thermostats, on the other hand, require more complex wiring. These thermostats typically have several terminals, including “R,” “W,” “Y,” “G” and “C”.
The ‘R’ terminal provides power, the ‘W’ terminal controls the heating system, the ‘Y’ terminal controls the cooling system, the ‘G’ terminal is used to control a fan, and the ‘C’ terminal is a common terminal that connects the thermostat to the equipment.
However, If it’s not feasible for you to attach wires to your thermostat, you should consider finding a battery-powered model that won’t require the ‘C’ terminal for it to work properly.
Unfortunately, if the battery runs out of power, this type of thermostat will be rendered useless and it will no longer function.

It is important to note that the wiring colors and terminal labels may vary depending on the manufacturer. A wiring diagram is usually provided with the thermostat and the equipment, which can be used to identify the correct wires and terminals.
Furnace to Thermostat Wiring?
The number of wires that a thermostat needs depends on the type of heating and cooling system you have and the features of the thermostat you want to install.
A traditional thermostat usually requires two or three wires, while a programmable or smart thermostat may require four or more wires.
Here are the most common wiring configurations for thermostats:
2 wire thermostat wiring
2 wire thermostats typically use a red and a white wire, which are connected to the ‘R’ and ‘W’ terminals, respectively. These wires are used to control the heating system.
3 wire thermostat wiring
These thermostats usually have a red, white, and green wire, which are connected to the ‘R’, ‘W’, and ‘G’ terminals, respectively. The green wire controls the fan, while the red and white wires control the heating system.
thermostat wiring 4 wire
4 wire thermostat wiring color code includes a red, white, green, and yellow wire, which are connected to the ‘R’, ‘W’, ‘G’ and ‘Y’ terminals, respectively.
The green wire controls the fan, the yellow wire controls the cooling system, and the red and white wires control the heating system.
5 wire or more wire thermostat wiring
Some programmable or smart thermostats may require five or more wires, depending on the features they offer. The additional wires may be used for functions such as controlling a humidifier, air purifier, or to provide a constant power source (C wire).
It’s important to note that the specific number and color of wires can vary depending on the manufacturer and type of thermostat, so it is always best to consult the wiring diagram or instructions provided with your specific thermostat to determine the correct number and configuration of wires.
How Do You Wire A 3 Wire Thermostat?
Wiring a 3-wire thermostat is a straightforward process, but it is important to follow the correct steps to ensure proper installation. Here’s how to do it:
- Turn off power:
Before starting, turn off power to the heating and cooling system by switching off the circuit breaker or removing the fuse. This will ensure safety while working with electrical wiring.
- Identify the wires:
Typically, the wires connected to the thermostat are red (R), white (W), and green (G). The red wire is the power wire that provides power to the thermostat, the white wire is the heating wire, and the green wire is the fan wire.
- Connect the wires:
Connect the red wire to the ‘R’ terminal on the thermostat, the white wire to the ‘W’ terminal, and the green wire to the ‘G’ terminal. If the thermostat doesn’t have a ‘G’ terminal, leave the green wire disconnected.
- Install the thermostat:
To fix the thermostat on the wall, mount the unit on the wall plate and secure it in place by tightening the screws.
- Restore power:
Restore power to the heating and cooling system by turning the circuit breaker back on or replacing the fuse.
- Test the thermostat:
Turn on the heating and cooling system and test the thermostat to ensure it is working correctly. If the system is not responding to the thermostat, check the wiring connections and make sure they are secure.
It’s important to carefully follow the instructions provided with your specific thermostat to ensure proper installation. If you’re not confident in your ability to install a thermostat, it’s always best to consult with a professional HVAC technician.
What is a Thermostat C Wire?
The ‘C’ wire, also referred to as the common wire, provides a thermostat with continuous power. The 24-volt transformer that powers the thermostat in many heating and cooling systems is provided by the furnace or air handler.
Note: If you’re new to wiring a thermostat to your furnace, we suggest checking out our guide on “how to wire a thermostat to a furnace.”
Certain features, like a large display or a Wi-Fi connection, which are frequently found in programmable thermostats, may not be able to be operated by some systems, though.
In these situations, the thermostat is constantly powered by the ‘C’ wire ensuring that it has the power it needs to function properly.
A thermostat might not be able to carry out specific tasks, like keeping its settings or showing the current temperature without a ‘C’ wire. Likewise, the thermostat might not be able to control the heating and cooling system if the batteries run out.
The ‘C’ wire guarantees that the thermostat can carry out its intended functions even if the battery runs out by offering a constant power source.
Some people prefer smart thermostats without a C wire because they are easier to install, especially for those without electrical experience, and they can be more compatible with older homes or systems that lack a C wire.
Additionally, using a C wire-less thermostat can save on costs by eliminating the need for professional installation or system modifications.
These thermostats often rely on batteries for power, making them suitable for areas with frequent power outages or to avoid disruptions during maintenance.
However, it’s important to consider that thermostats without a C wire may have compatibility limitations and shorter battery life compared to wired thermostats.
To sum up, the ‘C’ wire plays a crucial role in the operation of a programmable thermostat. It ensures that it has the necessary power to perform its intended functions and control the heating and cooling system effectively.
How Does A Thermostat Work Without ‘C’ Wire?
A thermostat can work without a ‘C’ wire, but it may not have all the features and functions of a thermostat that is connected to a ‘C’ wire. Here’s how it works:
- Battery-powered thermostats:
Some thermostats are designed to work without a ‘C’ wire and are powered by batteries instead. These thermostats use the batteries to power their functions and control the heating and cooling system. The batteries need to be replaced periodically, usually once a year.
- Power stealing:
Some thermostats are designed to “steal” power from the heating and cooling system to power their functions. This is achieved by tapping into the power that is being supplied to the heating or cooling system.
While this method works, it may not provide enough power to the thermostat to fully support its functions.
- Remote sensors:
In some cases, a remote sensor can be used in place of the ‘C’ wire. The remote sensor is placed near the heating and cooling system and is connected to the thermostat via a wire. The remote sensor provides power to the thermostat, which eliminates the need for a ‘C’ wire.
It’s important to note that a thermostat that does not have a ‘C’ wire may not be able to perform all its intended functions, such as maintaining its settings or displaying the current temperature.
However, if the batteries run out or the power-stealing method is not working correctly, the thermostat may not be able to control the heating and cooling system.
Final Thoughts
In conclusion, understanding thermostat wiring is crucial for anyone looking to install, troubleshoot, or upgrade their thermostat system.
In this blog post, we’ve covered the fundamentals of thermostat wiring, including the different wires and their functions.
By familiarizing yourself with the wiring process, you can confidently handle any thermostat-related tasks.
Remember, safety should always be a top priority, so it’s essential to turn off the power before working with thermostat wires and consult a professional if you encounter any complex wiring situations.
Armed with this knowledge, you’ll be able to connect and configure your thermostat with ease, ensuring optimal comfort and energy efficiency in your home.


Pingback: How To Get Thermostat Off Sleep Mode | Meta Domotics
Pingback: How To Test A Thermostat? | Meta Domotics
Pingback: How To Wire A Thermostat To A Furnace | Meta Domotics
Pingback: How To Clean A Thermostat? | Meta Domotics
Pingback: How To Change The Battery In A Honeywell Thermostat
Pingback: How To Take A Nest Thermostat Off The Wall | Meta Domotics
Pingback: How To Fix A Thermostat On The Wall? | Meta Domotics
Pingback: How To Install A Thermostat? | Meta Domotics
Pingback: How To Install A Honeywell Thermostat? | Meta Domotics
Pingback: 4 Best Baseboard Heater Thermostats 2023 | Meta Domotics
Pingback: Best Multi Zone Smart Thermostat in 2023 | Meta Domotics
Pingback: The 5 Best Thermostats for a Heat Pump in 2023 | Meta Domotics
Pingback: The 5 Best Thermostats For Airbnb 2023 | Meta Domotics
Pingback: Best Smart Thermostats Without 'C' Wire in 2023 | Meta Domotics