Note: In this blog post we only covered the guidelines involving 24v wiring techniques as it is the most common wiring method for the majority of the HVAC systems.
The 110/240V wiring and multi volt thermostat wiring guides will be coming soon!
Knowing how to wire a thermostat can be both simple and complex, depending on the type of system you are working with.
It is essential to understand the basics of furnace thermostat wiring in order to ensure that your heating and cooling systems run efficiently and safely.
The most common types of home thermostats are digital non programmable thermostats or programmable thermostats , which may include a bunch of fascinating features like automatic temperature control etc.
With proper knowledge about your system’s wiring setup, you will be able to properly install or replace your existing thermostat in no time at all.
Please note, that in order to avoid redundancy by repeatedly writing the initial basic methods for every wiring system we have compiled the methods below that you may refer to later on.
Before we get started here are the 2 common methodologies on how to wire a thermostat that applies to any of the below mentioned wiring systems:
These methods work best if you have the old HVAC system in place and want to wire a new thermostat.

This guide will provide step-by-step instructions on how to wire a thermostat for any residential space climate control system starting from the simplest 2 wire thermostat guide, all the way up to the complex 8 wire thermostat systems and their common issues.
How to Wire a Thermostat Wire for Wire?
Step 1: Turn off the power to your HVAC system and remove the back panel of the air handler to access the thermostat wires.
Step 2: Trace each wire that is connected to your old thermostat, one at a time, and write down which terminal it is connected to on a piece of paper.
This allows you to make sure you get them all back in place correctly later when installing the new thermostat.
Step 3: Once you have everything labelled, disconnect each individual wire from its respective terminal end.
Do this carefully so as not to damage or bend any of the fine copper wiring or terminals themselves; it’s often best to use needle nose pliers for wire removal instead of just pulling it by hand.
This will help prevent any damages to the wiring and ensure easy reconnection down below for a secure fitment during installation of your new unit .
Step 4: After all wires are disconnected from their respective connections proceed with removing the old mounting plate (where appropriate).
It helps having an extra set hands and eyes here given how tight these mountings can be secured when initially fitted into place – often needing special tools such as flat head screw drivers etc., plus vice grips or pipe wrench (as needed).
Step 5: Having removed the old mounting plate proceed to connect the new wiring connections one by one ensuring all terminals are lined up correctly and securely connected.
This is important work that requires patience and a steady hand as small mistakes can be costly if not done properly.
Step 6: Once all of your wires are secured in place add back the mounting plate and then secure the thermostat to it, making sure all screws are tight and that your wiring is securely connected to the correct terminals.
Step 7: Finally, turn on the power to your HVAC system and you’re done! Your new thermostat wire should now be functioning properly. Enjoy!
Wiring a Thermostat using Standard Wiring Colors

| Labels | Wire Colors | Wiring Functions |
| Y | Yellow | Cooling |
| Y2 | Light Blue/Other Colors | 2 Stage Cooling |
| W | White | Heating |
| W2 | Brown/Other Colors | 2 Stage Heating |
| G | Green | Indoor Fan/Air Handler |
| C | Blue/Black | Common Wire |
| R | Red | 24V Power |
| RC | Red | 24V Power |
| E | No Universal Color | Emergency Heating |
| X/Auxiliary | No Universal Color | Auxiliary Heating |
| B | Dark Blue | Reverse Valve For Heating |
| O | Orange | Reverse Valve For Cooling |
| S1/S2 | No Universal Color | For Outdoor Unit |
If the thermostat has been removed and you do not know which wires were connected to which terminals, the best course of action is to locate and review the owner’s manual for your specific model.
This should include a complete diagram of how to wire a new thermostat correctly. If this is not available, then consult a qualified HVAC professional to safely rewire the system.
It is important that all wiring connections be clear and correct for safety reasons as well as proper functioning of your furnace or air conditioning system.
- Connect the Red wire to the R terminal
- Connect the Green wire to the G terminal (Fan)
- Connect the White wire to the W terminal (Heat)
- Connect the Yellow wire to the Y terminal (AC)
- Connect the Blue wire to the C terminal (Common wire)
- To keep extra wires from touching terminals or bare wire, wrap them around the bundle.
How to Wire a 2 Wire Thermostat?

Step 1: Switch off the power to the heater. Make sure that the power is off before you begin wiring your thermostat; otherwise, you may be electrocuted.
Step 2: Remove the existing thermostat cover and wire connections that go into it. Disconnect all wires one by one and take note of which slot each wire connects to on your old thermostat.
Step 3: Connect the Red wire (this is usually a live hot line) to either side of the terminal “R”, or Red colored slot, while connecting white colored (neutral) wires in one of two slots named “W” or White (for heating) respectively depending on what type of system you are using – cooling or heating .
Step 4: Place a fresh battery inside your new two-wire device for backup purposes.
Thus completing electrical connectivity between both sides – i.e., from heater as well as battery source at least during outages cases in future when no electricity is available at home/office/building etc.
Step 5: Mount backplate adapter plate along with wall box if necessary followed by mounting face plate of newly installed thermostats while making sure other components such as screws washers etc., are securely fastened to the wall surface.
Step 6: Finally switch ON electricity supply to your heating/cooling system and test whether it is working properly or not. If all goes well, which it should, turn off power and put back thermostat cover plate over thermostat body.
How to Wire a 3 Wire Thermostat?
Step 1: Gather the Necessary Tools and Materials. Before wiring a 3 wire thermostat, you should gather the necessary tools and materials, including a voltage tester, wire connectors or caps, electrical tape, needle nose pliers, and screws.
Step 2: Turn off the Power Source. Be sure to switch off all power sources to prevent electrocution or damage when wiring a 3 wire thermostat.
Step 3: Connect Wires to Thermostat Terminals. Usually there are three wires—red for R (power), white for W (heating) and green for G (cooling).
Step 4: Depending on where it was on the previous thermostat, connect the red wire to either the R or RC terminals for 24V power.
Connect White wire to the W terminal for heating. Create a C wire out of one of the spare wires. Green is the color most commonly used by technicians for this purpose; however, the original thermostat may use black. Connect the G terminal with the G wire.
Step 5: Secure wiring with wire connectors or caps. After connecting the wires from your HVAC system to each terminal on your thermostat’s base plate, secure them using either small plastic wire connectors(twist-on caps) or electrical tape in order for them not be loose due vibration when running HVAC system’s fan motor.
Step 6: Test Voltage Supply. To ensure that the wiring has been done correctly, use a voltage tester to check the supply of power before connecting your thermostat to its base plate.
Step 7: Connect Thermostat Base Plate to Wall.
Step 8: Test Again for Power Supply.
With these steps, you should now know how to wire a 3 wire thermostat. If you’re still having trouble it’s recommended to contact a technician in this regard.
How to Wire a 4 Wire Thermostat?

Step 1: Turn off the power to your air conditioning system at the breaker box.
Step 2: Disconnect existing thermostat wiring from wall plate.
Step 3: Depending on where it was on the previous thermostat, connect the Red wire to either the R or RC terminals for 24V power.
Step 4: To switch the heat pump thermostat to heating mode, connect the White wire to the W terminal.
Step 5: To activate the air conditioner, connect the Yellow wire to the Y terminal.
Step 6: Join the fan’s Green wire to the G terminal.
Step 7: Securely attach the thermostat base plate to wall unit, using provided screws or tape.
Step 8: Restore power, and test that new thermostat is operating correctly.
This 4 wire thermostat wiring is for simple, single stage heat pumps and other systems that don’t require a common wire.
If you have a two-stage heat pump system, or any other system with more than one stage of heating and cooling, then you will need to upgrade your thermostat wiring to accommodate the extra stages and/or additional components.
Additionally, if you’re switching from a non-heat pump system to a heat pump system, then you’ll need to upgrade your wiring as well.
When in doubt, always consult a qualified electrician to ensure that your wiring is suitable for the needs of your specific HVAC system.
How to Wire a 5 Wire Thermostat?
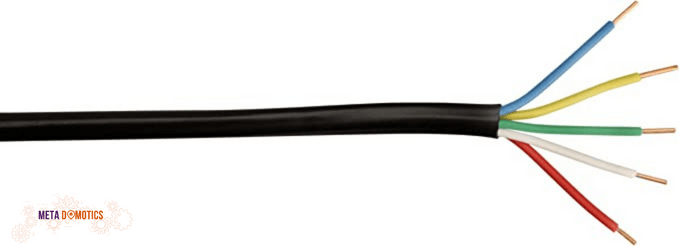
Step 1: Turn off the power to your air conditioning system at the breaker box.
Step 2: Disconnect existing thermostat wiring from wall plate.
Step 3: Connect the 24V power source’s red wire to the R terminal.
Step 4: For the heating configuration, the White wire should be connected to the W (or W1) terminal.
Step 5: To operate in AC/cooling mode, connect the Yellow wire to the Y terminal.
Step 6: Connect the green wire to the fan’s G terminal.
Step 7: Connect an extra wire, such as a black wire, to the C terminal (also known as the Common or C terminal).
Step 8: Securely attach the thermostat base plate to wall unit, using provided screws or tape.
Step 9: Restore power, and test that new thermostat is operating correctly.
How to Wire a 6 Wire Thermostat?
Step 1: Turn off the power to your air conditioning system at the breaker box.
Step 2: Disconnect existing thermostat wiring from wall plate.
Step 3: Connect the 24V power source’s red wire to the R terminal.
Step 4: For the heating configuration, the White wire should be connected to the W (or W1) terminal.
Step 5: To operate in AC/cooling mode, connect the Yellow wire to the Y terminal.
Step 6: Connect the green wire to the fan’s G terminal.
Step 7: Connect an extra wire, such as a black wire, to the C terminal (also known as the Common or C terminal).
Step 8: Connect an unused wire, such as the Light Blue wire, to the X/Aux terminal to enable Aux heat strips in the air handler if the heat pump is a single stage model.
Or
Connect the Light Blue wire to the Y2 terminal for 2 Stage Cooling if your heat pump has that capability.
Or
The Brown wire should be connected to the Y2 terminal for 2 Stage Heating if the heat pump has such a feature.
You must read the manuals and check the thermostat installation instructions to find out exactly what features your HVAC system has.
Step 8: Securely attach the thermostat base plate to wall unit, using provided screws or tape.
Step 9: Restore power, and test that new thermostat is operating correctly.
How to Wire a 7 Wire Thermostat?
Step 1: Turn off the power to your air conditioning system at the breaker box.
Step 2: Disconnect existing thermostat wiring from wall plate.
Step 3: Connect the 24V power source’s red wire to the R terminal.
Step 4: To switch the heat pump to heating mode, connect the White wire to the W (or W1) terminal.
Step 5: To operate in AC/cooling mode, connect the Yellow wire to the Y terminal.
Step 6: Connect the green wire to the fan’s G terminal.
Step 7: Connect an extra wire, such as a black wire, to the C terminal (also known as the Common or C terminal).
Step 8: Join the X/Aux terminal with the Light Blue wire to activate the auxiliary heating.
Step 9: The heating reversing valve’s B terminal should be connected to the Dark Blue wire.
Step 10: For the cooling reversing valve, connect the orange wire to the O terminal.
Step 11: Securely attach the thermostat base plate to wall unit, using provided screws or tape.
Step 12: Restore power, and test that new thermostat is operating correctly.
How to Wire a 8 Wire Thermostat?
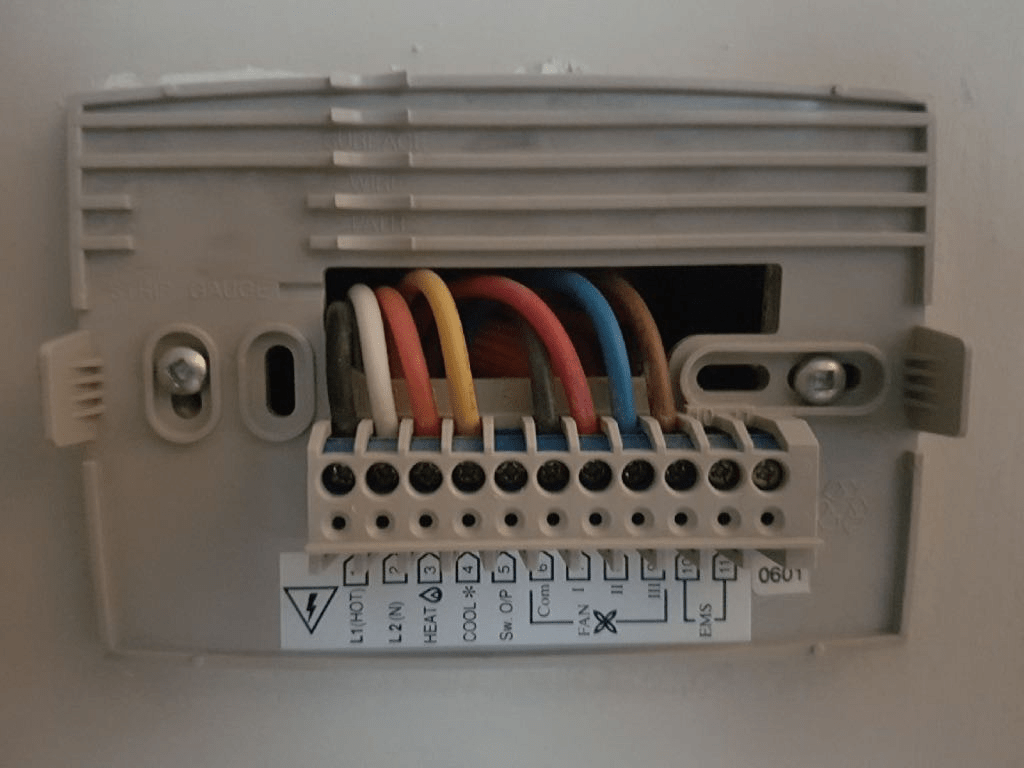
Step 1: Turn off the power to your air conditioning system at the breaker box.
Step 2: Disconnect existing thermostat wiring from wall plate.
Step 3: Connect the 24V power source’s red wire to the R terminal.
Step 4: To switch the heat pump to heating mode, connect the White wire to the W (or W1) terminal.
Step 5: To operate in AC/cooling mode, connect the Yellow wire to the Y terminal.
Step 6: Connect the green wire to the fan’s G terminal.
Step 7: Connect an extra wire, such as a black wire, to the C terminal (also known as the Common or C terminal).
Step 8: Join the X/Aux terminal with the Light Blue wire to activate the auxiliary heating.
Step 9: The heating reversing valve’s B terminal should be connected to the Dark Blue wire.
Step 10: For the cooling reversing valve, connect the orange wire to the O terminal.
Step 11: Securely attach the thermostat base plate to wall unit, using provided screws or tape.
Step 12: Restore power, and test that new thermostat is operating correctly.
How To Trouble-shoot Thermostat Wiring In 9 Simple Steps
Step 1. Turn off power to the thermostat.
Step 2. Disconnect the old wires from the thermostat, making note of how they were connected.
Step 3. Connect the new wiring per manufacturer instructions and ensure that all connections are secure and insulated properly.
Step 4. Restore power to the thermostat and test for proper operation by running a heating or cooling cycle if applicable, or just checking that settings were updated correctly on digital models with temperature displays..
Step 5. If everything is working as expected, replace cover plate on wall over thermostat unit and enjoy your newly wired thermostat!
Step 6. If the thermostat is not working as expected, check all wiring connections and ensure that power to the unit has not been disrupted.
Step 7. If this does not solve the problem, try replacing components such as batteries or other parts related to your specific model of thermostat.
Step 8. Finally, if you have tried all of the above methods and are still encountering issues, it is best to contact a professional electrician for further assistance.
Step 9. They can help you find the source of the problem and get your thermostat back up and running in no time.
Final Thoughts
Wiring a thermostat doesn’t have to be difficult. With the right tools, safety precautions and knowledge of electrical circuits you can safely wire your new thermostat in no time.
Remember to turn off all power before beginning any wiring project for the best results.
After that it’s just a matter of connecting wires from their respective terminals and following manufacturer instructions for configuring other settings like heating/cooling preferences or scheduling options.
Once complete, enjoy the benefits of having an automated temperature control system!



Pingback: How To Add A Common Wire To Thermostat?
Pingback: How Does A Boiler Thermostat Work? | Meta Domotics
Pingback: How To Replace A Thermostat? Here's What You Should Know .
Pingback: Thermostat Wiring | Meta Domotics
Pingback: AC Thermostat Not Working? Here's What You Need To Know
Pingback: 4 Best Baseboard Heater Thermostats 2023 | Meta Domotics
Pingback: Best 2 Wire Heat only Thermostats 2023 | Meta Domotics
Pingback: Best Smart Thermostats Without 'C' Wire in 2023 | Meta Domotics
Pingback: Best Non Programmable Thermostat in 2023