

Are you looking to wire a thermostat to a furnace? If so, then you’ve come to the right place.
Wiring a thermostat to a furnace can be intimidating, but it doesn’t have to be! With the proper tools and knowledge, wiring a thermostat for your furnace can be done in just a few simple steps.
In this guide, we will provide step-by-step instructions on how to safely and effectively wire up your thermostat with minimal effort. So let’s get started!
As long as you have the right tools and know-how, this process should take about an hour or two.
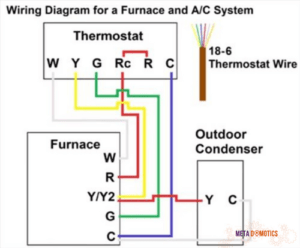
Before beginning, it is important to familiarize yourself with how to read thermostat wiring diagrams in order to understand which connections need to be made.
The diagram will vary depending on your furnace model, so make sure you get the correct one.
How to Wire a Thermostat to a Furnace?

Once you’ve done that, the steps to wire a thermostat to a furnace are as follows:
- Locate the control board:
The first step is to locate the control board in your furnace. It will typically be located near the burners and blower motor.
This is where all of the wiring connections will be made. If you are unsure how to remove the panel cover, consult your owner’s manual or contact a professional HVAC technician for assistance.
- Disconnect power:
Next, disconnect power from your furnace by either unplugging it from an outlet or turning off its power at the circuit breaker box.
You must do this in order for safety reasons and to prevent any electrical shocks or damage to components.
- Open the thermostat:
Open up the thermostat cover, and remove both batteries if there are any.
- Remove wiring:
Remove old wiring from your existing thermostat base (if applicable).
- Connect wiring:
Now it’s time to start connecting wires from your new thermostat to the furnace control board.
To begin this process make sure that all wires are properly labeled and connected according to their designated colors; Red (power), White (heat), Green (fan), Blue (common wire) & Yellow (cooling).
- Connect a red wire:
Connect a red wire from the Rc or Rh terminal on your new thermostat to your furnace’s Rc/Rh terminals (red wires are usually used with gas furnaces and heat pumps; some electric furnaces may also use it for their heat strips).
Connect all other necessary wires according to manufacturer’s instructions. Some possible connections include green G wires, yellow Y wires, orange O wires, and blue B or C common wires.
Refer to product’s installation manual for these details.
- Put in the batteries:
Put in fresh batteries if desired, and close up the face plate of Thermostat once you have reassembled it as needed depending on brand/model.
Once all of these wires are connected properly, reinstall your panel cover making sure not to pinch any wires.
Lastly, reconnect power back into your furnace and test out your new thermostat before putting everything away again!
How Furnace Thermostat Wiring Works?
A thermostat acts as a switch that turns your thermostat on/off when a desired temperature set point is reached. The thermostat makes use of the 24 volts AC from the transformer to regulate the furnace.
The two 24 volt wires are connected to R and C terminal inside the thermostat.
Below are the steps mentioned, explaining how a furnace thermostat works:
- Step 1:
The user sets the thermostat to the desired temperature.
- Step 2:
When the indoor temperature drops below this set point, the thermostat triggers its internal fan switch and sends an electrical signal to your furnace’s blower motor control unit.
- Step 3:
The blower turns on and blows air over cold coils until it reaches the set temperature for heating mode, at which point it shuts off automatically or manually depending on how you have configured it in advance.
- Step 4:
A safety device called limit switch may also be used as part of this process, as it ensures that all parts of your system are working safely while controlling heating cycles according to government regulations in some cases (such as Canada).
- Step 5:
After reaching a steady state condition where both temperatures are equal, the thermostat then tells your furnace to shut off until it senses another drop below your pre-set level again at which time the entire process repeats itself anew until you decide otherwise with a manual override button or setting change if applicable.
This keeps energy bills low while providing a comfortable atmosphere inside of your home or business premises. Hope this helps. Please feel free to reach out if you have any questions by leaving a comment below.
Conclusion
In conclusion, furnace thermostat wiring is an essential skill for any homeowner. As discussed in this blog post, there are several key lessons to take away.
First and foremost, always prioritize safety by turning off the power to the furnace before starting any wiring work.
Secondly, understand the wiring diagram provided by the manufacturer and identify the corresponding terminals for the thermostat.
Properly connecting the wires to their designated terminals is crucial for the thermostat to function correctly
Lastly, consider labeling the wires during the disconnection process to make reconnection easier.


Pingback: How To Add A Common Wire To Thermostat?
Pingback: How To Jump Thermostat Wires For Heat? | Meta Domotics
Pingback: How To Wire A Thermostat? Step-By-Step Wiring Guide
Pingback: 5 Best Thermostat For Airbnb | Top Picks of 2023 | Meta Domotics