

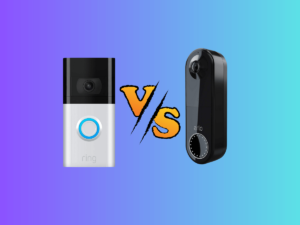
Hey there! Ready to dive into the ultimate smart doorbell showdown? We’ve got a face-off between Ring vs Nest doorbell and we’re here to help you pick the winner.
We all want our homes secure and deliveries safe, right? But choosing the perfect doorbell can be a bit overwhelming.
Let’s take Ring Doorbells as an example. We’re not just talking about Ring vs Nest doorbell here. See, Ring is one of the major players in the smart doorbell game.
But there are way too many Ring doorbell alternatives out there that are honestly nailing it in different aspects.
We’re talking about doorbells that give you a run for your money, minus the subscription fees, and still bring a bunch of cool features to the table.
Nonetheless, today we’re breaking down all the details, comparing features, and giving you the lowdown on what makes these doorbells tick. So, let’s dig in and figure out which one’s the real champ for your doorstep!
Google Nest vs. Ring Pro – Detailed Analysis

Two doorbells, two visions of quality – it’s Nest Doorbell Wired (2nd Gen) against Ring Doorbell Pro in the quest for the finest video, audio, and overall user experience.
Please note that these are not battery-powered models but both Ring and Nest do offer battery options for these doorbells. Both wired and battery-powered options are pretty much the same in terms of features.
Nest Doorbell vs. Ring Pro – 10 Key Similarities
- Advanced Detection: Both doorbells are equipped with advanced motion detection technology that alerts you when someone’s near your door. They can distinguish between people, animals, packages, and vehicles.
- Live View: You can check in on your front door anytime through a live video feed on your phone, tablet, or computer using their respective apps (Nest app for Nest Doorbell and Ring app for Ring Doorbell Pro).
Both can send motion-activated alerts to your mobile device, tablet, or PC, keeping you informed of activity.
- Two-Way Communication: Both doorbells offer two-way communication, allowing you to speak to visitors remotely using your smartphone.
- Wired Power: They both require a wired power connection, eliminating the need for battery recharging.
- App Integration: The Nest Doorbell requires the Google Home app, while the Ring Doorbell Pro operates within the Ring app. Both apps provide control over doorbell settings, alerts, and video history.
- Subscription Plans: They offer optional subscription plans for more advanced features. For example, Nest Aware and Ring Protect plans provide longer video history storage and additional benefits.
- Compatibility: Both doorbells can integrate with virtual assistants like Amazon Echo Dot and Google Assistant, allowing you to use voice commands to interact with the doorbells and see live video feeds on Amazon Echo.
- Privacy Settings: Both doorbells offer customizable privacy settings, letting you decide when and how the doorbell records and shares video.
- Connectivity: They support dual-band Wi-Fi (2.4 GHz and 5 GHz) for a reliable and strong connection.
- Wiring: Both require wiring to your existing doorbell setup, and they include the necessary tools and instructions for installation. Tip: Install the Nest doorbell at the recommended height of 4 feet (1.22 m) above the ground.
Nest Doorbell vs. Ring Pro – 9 Key Differences
- Video Quality: Nest Doorbell captures video at 960 x 1280 pixels with a 3:4 aspect ratio, providing a clear view of visitors and surroundings. Ring Doorbell Pro records in 1080p HD resolution with a 160-degree field of view.
However, Nest Doorbell takes the edge here in our opinion with a slightly better video quality than the Ring Pro.
- Alert Subscription: Nest offers advanced motion alerts like person, animal, vehicle, or package alerts for free without a subscription, but Ring Pro’s advanced features may require a subscription.
- Night Vision: The Nest Doorbell utilizes infrared night vision with 10 infrared LEDs to assist in night vision with no patio lights ensuring visibility even in low light conditions. With the patio light on, the visuals are much clearer.
The Ring Pro on the other hand also uses an infrared sensor but it’s adequate and there is room for improvement. However, with the street lights or patio lights on, the quality is pretty decent.
- Subscription Plans: Nest offers two subscription plans, Nest Aware and Nest Aware Plus. The Ring Doorbell Pro offers a Ring Protect subscription, allowing video recording, review, and sharing for up to 180 days for $3.99 per month.
Nest Aware: Get up to 30 days of event video history and intelligent alerts such as familiar face detection for only $6 per month.
Nest Aware Plus: Or choose a Nest Aware Plus subscription for even more benefits, like 24/7 recording for up to 10 days. Be aware that the more Nest cameras you choose to have 24/7 recording for the more bandwidth it’s going to use.
- Motion Detection: With the Nest Doorbell, when someone arrives at your doorstep or the sidewalk the motion detection is triggered and it takes about 3 seconds for Nest to send you a motion alert.
As for the Ring Pro, you get a customizable motion sensor where you can mark areas outside your front door as part of the motion zone to prevent false motion alerts.
The accuracy is on point for both doorbells with the Ring Pro taking 4.16 seconds to send the motion alert to your smartphone.
- Integration: The Nest Doorbell requires the Google Home app instead of the Nest app and a Google account for setup and management.
The Ring Doorbell Pro integrates with the Ring app and seamlessly works with Alexa devices for voice control and alerts.
- Field of View: The Nest Doorbell offers a field of view with a 145° diagonal and a 3:4 aspect ratio, providing a comprehensive perspective of the surroundings. While Ring Pro offers a 160° FOV.
Both doorbells conveniently display the surroundings perfectly without any blind spots whatsoever.
- Chime Compatibility: The Nest Doorbell requires compatibility with a compatible chime and transformer, which need to be purchased separately.
The Ring Doorbell Pro may or may not work with your existing doorbell chime. But it will work for the Ring Doorbell Chime accessory for audible notifications.
- Audio Quality: The Audio quality on the Nest Doorbell is significantly better compared to the Ring Pro. The voice is clearer and more crisp even if the subject is standing at a distance from the doorbell. While the Ring Pro’s audio isn’t subpar, it could be improved.
- Pre-Roll Feature: The Nest Doorbell boasts a 6-second pre-recording or pre-roll feature which means it will show you a preview of 6 seconds before the motion sensor was triggered.
So you know what happened six seconds prior leading up to the alert. Ring Pro on the other hand has a 3-second pre-recording feature.
Ring vs Nest Doorbell – Specifications
| Specifications | Nest Doorbell 2nd Generation (WIred) | Ring Doorbell Pro |
| Video | HDR 960 x 1280 pixels with a 3:4 aspect ratio | 1080 HD Live Video, Live View, Color Night Vision |
| Audio | Crisp audio with two-way talk | Two-way audio with noise cancellation |
| Field of View | 145° diagonal field of view. Clear head-to-toe visuals. | 160° horizontal, 90° vertical |
| Motion Detection | ✅ | ✅ |
| Power | Requires a 16-24VAC, 10-40VA rated doorbell transformer, & chime (both sold separately). | Hardwired requires plug-in adapter or transformer (not included): 16-24 VAC, 40VA max, 50/60Hz No halogen or garden-lighting transformers; Ring DC transformer/power supply only |
| Alexa Integration | ✅ | ✅ |
| Internet | Requires high-speed internet | Connectivity 802.11 b/g/n Wi-Fi connection @2.4GHz and 5.0GHz |
| 2-Way Talk | ✅ | ✅ |
| Pre-Roll Video | 6-second pre-recording | 3-second pre-recording |
| Dimensions | 1.1 x 1.65 x 5.16 inches | 4.50 in. x 1.85 in. x .80 in. (114.3mm x 46.7mm x 20.3mm) |
| Subscription | ✅ | ✅ |
| What’s in the Box? | Nest Doorbell along with a bunch of useful stuff like a base plate, a 20° wedge, wire connector, chime puck, extra security screw, wall screws, hex key, spacers, window decal, a quick start guide, and a safety warranty document. | Video Doorbell Pro, a Satin Nickel Faceplate, the Pro Power Kit, installation tools and screws, wedge and corner kits, a user manual, and a security sticker. Plus, after setting up the device, you’ll receive a digital coupon for a free extra faceplate in select colors. |
Ring vs. Nest – App Setup
How to Add Nest Doorbell to Google Home?

![]()
- Step 1: Launch the Google Home App
Setting up Nest Doorbell is a seamless and straightforward process. First off, head over to your Google Home app and click on the “+” sign in the top left-hand corner.
- Step 2: Sync Nest Doorbell with the App
Select “Setup a device” and click on “New devices.” It will ask you to select the device you want to set up, so choose “Doorbell.”
Now grab a hold of the Nest setup guide that came in the box and find the QR code on it that you need to scan to sync your doorbell with the Google Home app.
Once you’ve scanned it, click “Continue” and just follow along the prompts until you get to the Wifi connectivity part of the setup.
- Step 3: Wifi Connectivity
Choose your Wifi network, name the doorbell, and after a few seconds, the live view should pop up on your screen indicating that the setup was successful.
- Step 4: Access the Doorbell
To access your Nest Doorbell, open the Google Home app and click on “Cameras” to get to the doorbell and you’ll find it there. If it’s wired, it will show the live view.
- App Features
Click on it to get to the main doorbell page where you can initiate a two-way conversation from the mic option. Then click on history to access the timeline and swipe left/right on the slider to view the events you want to see.
On the history page, look over to the bottom right-hand corner and click on more where you’ll find “Quiet time” and “Quick responses” where you 3 preset responses to choose from.
Next, to access the settings, click on the gear icon on the top right corner where you can play around with the settings and customize the Nest doorbell to your own preferences.
Overall, take your time to explore the app features, they’re intuitive and it will pay off. You can customize the doorbell to suit your specific needs.
Ring App – Ring Doorbell Pro Setup

![]()
- Step 1: Install the Ring App from the Play/App Store
After you’re done installing the Ring Doorbell Pro, install the Ring app and sign up if this is your first time setting up a Ring product. Then you want to click on “Setup a device” and click on “Doorbells.”
- Step 2: Scan the QR Code
The next step is to give the Ring app access to your camera so you can scan the QR code for the device you’re trying to set up.
You can find the code on the side of the doorbell, on the box, or even on the setup guide leaflet. So you scan the QR code and it will add the setup of the Ring Doorbell within the app.
- Step 3: Name the Doorbell
Once you’ve scanned the code, you’re just going to go through the prompts where it will ask you to name your Doorbell. You can either use 3 preset names or set a custom name for your doorbell.
- Step 4: Follow the Prompts
Next up, it will ask you what type of existing doorbell you have i.e., mechanical, digital, or none. Click on whatever option you have in your scenario.
Then it will ask you whether the light on the doorbell is spinning, Click on “Yes” if it is if not you probably forgot to turn the breaker back on after you installed to doorbell. So make sure the doorbell has power before you set it up.
- Step 5: Wifi Setup
From there it will take you to the Wifi setup where you want to hook it up to your Wifi network. And finally, the doorbell would freak you out by saying “Ring doorbell is connected to the Ring app.”
You’ll get a prompt on your screen indicating that the setup is complete and the light on the doorbell should stop spinning.
Note: You may come across a firmware update on the Ring app once you’re done setting up the doorbell. It should only take about 15 minutes, don’t interrupt it just let it go through its due process.
Now within the app, there are a couple of different features depending on what you want to do. All settings are pretty intuitive and shouldn’t take you long before you’re done setting up your doorbell completely.
First up, you’ll have the live view bar in the middle that will take you straight to the live view of your front door no matter where you are.
Motion Settings
Then you have the motion settings. Over here you get to set up the motion zones which are basically areas where you want your doorbell to detect motion and send you alerts.
It’s a pretty useful feature that’ll help reduce false alerts of cars or people passing by on the street. Click on “Edit motion zones” and click on the blue highlighted box that is the default motion detection zone.
Use the dots to customize the motion zone to your own preference and once you’re done, click on “Save zone.”
Next up, you have “Motion Sensitivity” where you can use the slider to adjust the sensitivity of motion alerts.
You probably should let that stay on default because you have the “People Only Mode.”
People Only Mode
This mode means the doorbell will only notify you when there’s a human detected within the motion zone. When you activate the people-only mode you don’t have to worry about the sensitivity as it automatically sets it for you.
Reasons to Buy – Ring Doorbell Pro

1. Rich Notifications
- Whenever you get a motion alert on your smartphone, the Ring app shows you a snapshot preview of what’s going on your doorstep.
- This feature can be pretty convenient as you can just quickly look at the preview and decide whether or not you have to look at the live view at that moment if it’s really important.
2. Custom Alert Tones
- From a variety of motion alert tones, you can customize your preferred motion alert tone for different devices and you’ll know which Ring device is triggered.
- Many of the Ring competitors don’t have this feature and you just end up getting a generic alert tone which is the same tone used by all other apps on your phone.
3. Capture Snapshots
- Within the app, you can set this feature which enables your Ring Doorbell Pro to capture snapshots for the desired frequency from every 3 minutes, 1 minute to 30 seconds.
- This is as close as you can get with 24/7 recording with your Ring Doorbell
4. Pre-Roll
- Although the Nest Doorbell 2nd Gen offers a better pre-roll feature of 6 seconds. But for those who would prefer Ring, it’s nice to know that you get a 3-second pre-recording feature on the Ring Pro as well.
- What this basically does is it starts recording 3 seconds before the motion is triggered. So you know what happened 3 seconds prior to the alert.
5. Customizable Motion Zones
- You can manually set the motion zones where you would want to get alerts whenever someone or something enters it.
- This is particularly useful for avoiding unnecessary alerts like a car passing by on the street. Perfect for living on bustling streets.
- And if you’re not a fan of constant car notifications, switch to “People Only Mode.” You’ve got options. Oh, and color night vision? Yeah, this doorbell’s got it.
6. Amazon Alexa Integration
- Seamless Echo Dot and Echo Show integration which can act as a chime and you can use your Echo Show device to check the live view or engage in a conversation with the visitor outside.
- This doorbell and Alexa are like a dynamic duo. Set up routines, and have Alexa announce arrivals.
- Sure, there might be a few seconds before your Echo Show shows who’s at the door, but it’s worth it.
7. Quick Notifications
- The notification speed is faster than a squirrel on caffeine. Whenever someone triggers the motion sensor is about 5 seconds.
- So the motion alerts are pretty accurate and timely, it’s like a vigilant virtual doorman 24/7 on your front door.
8. Installation
- No need to hire a handyman. With clear instructions in the Ring app and YouTube videos, even newcomers to wiring can handle the setup.
- Thanks to Ring for including every tool you’ll need, right down to the drill bit and screwdriver.
9. One Smart Team
- Sync it up with Ring Alarm and watch all your Ring cameras spring into action when the alarm goes off.
10. Time Capsule
- Want to know what went down while you were out? The “Recent Activity” tab spills the beans. From missed doorbell rings to package arrivals, it’s all right there.
11. Looks That Impress
- Let’s be honest, this doorbell’s got style. It’s the James Bond of doorbells, classy and sleek.
- Plus with those customizable faceplates with multiple color options, you can add a touch of personalization to the doorbell to match your aesthetic.
12. Customer Service
- Ring’s got your back, no doubt about it. From troubleshooting to product info, they’re courteous, professional, and helpful. They’re even on Twitter, answering your questions.
13. Silence
- The option to silence the traditional doorbell chime from inside the house may be a highlight for most parents.
- Especially when trying to avoid disturbances when the kids are asleep.
Reasons to Avoid – Ring Doorbell Pro
1. Power Play
- The original doorbell transformer may not pack enough juice to keep this doorbell running. The Ring Pro needs a transformer with at least a 16v/30va rating.
- No worries if your home is a bit seasoned or even brand-new, chances are you’re stuck with a “contractor-grade” transformer that won’t cut it.
2. Chime
- If you own a mechanical chime, the good ol’ ding dong type. Chances are, it might take up to 3-7 seconds to chime in after the Ring Doorbell Pro gets pressed.
- It’s a known issue that might go away with a firmware update.
3. Nighttime Motion Detection
- The doorbell seems overly sensitive to any change in lighting, resulting in false alerts triggered by things like car headlights or lightning during storms.
4. Audio Quality
- While the video quality is fantastic, I found the audio quality to be lacking. Clearer audio would enhance the communication experience with visitors.
5. Integration Limitations
- Users may appreciate the IFTTT integration, but they could wish there was a way to stream video to other smart home devices like a SmartThings hub.
Reasons to Buy – Google Nest Doorbell 2nd Gen

1. Seamless Integration
- The Nest Doorbell effortlessly blends into your smart home setup, especially if you’re already immersed in the Google ecosystem. It syncs smoothly with your Google products, making the setup process a breeze.
2. Clever Power Solution
- If you’re dealing with outdated doorbell transformers or chimes, the Nest Doorbell offers an innovative workaround.
- By using a separate 24Volt cord, you can power the camera without the need for extensive electrical work, offering both convenience and practicality.
3. Alexa Integration
- With the ability to announce doorbell rings on Alexa devices and send notifications to your Alexa app, you’re always connected to your front door activity.
4. Eye-Catching Design
- Not only does the Nest Doorbell excel in functionality, but it’s also visually appealing.
5. Value for Money
- While many competitors come with a heftier price tag, the Nest Doorbell offers a true bang for your buck.
6. Swift Responses
- The Nest Doorbell sets itself apart with its lightning-fast responsiveness. Faster than the Ring Doorbell Pro. It sends a motion alert within 3 seconds of it being triggered.
7. Face Recognition
- “Familiar Face” is a standout feature with its ability to recognize faces and people that you know. So it will notify you when it detects people it doesn’t recognize.
8. Superior Camera Quality
- The camera quality on the Nest Doorbell is nothing short of exceptional. With phenomenal visual clarity, you’ll have a crystal-clear view of your surroundings.
9. Live Interaction
- The doorbell’s real-time communication capability allows you to have live conversations with visitors at your doorstep with crystal-clear audio in duplex transmission as opposed to the Ring Doorbell Pro with subpar audio.
10. Multi-Device Notifications
- If you have multiple Google Home speakers placed around your house, the Nest Doorbell takes full advantage.
- You’ll receive notifications on each device, ensuring you never miss a doorbell ring, no matter where you are.
Reasons to Avoid – Nest Doorbell 2nd Gen
1. Limited Resolution
- While suitable for smaller screens like cell phones, larger displays might highlight the resolution’s shortcomings. Details like license plates or nearby text might not be as clear as desired.
2. Subscriptions
- One of the primary attractions is the ability to view short-term recorded clips without a subscription.
- However, the catch is that continuous 24-hour recording and cloud clip access require a subscription.
- Some of the more advanced features like facial recognition & refined alert customization are locked behind a subscription paywall. This could be frustrating for users who wish to access all capabilities without ongoing fees.
3. Local Recording
- Unlike some competing brands, the Nest Doorbell doesn’t offer local recording to onboard memory.
4. User Interface
- While the Google Home software integration is seamless for the most part, some users may find it less intuitive than other brands, particularly Ring.
5. Invasive Recording Light
- One noticeable annoyance is the inability to turn off the recording status light.
- This green light draws attention to the camera whenever someone walks by, potentially impacting the discreetness of the device.
6. Battery Charging
- The need to recharge the battery is a common drawback of wireless doorbell cameras, including the Nest Doorbell.
- Users can expect about a week of usage between charges, though this duration can vary based on remote usage.
7. Overabundant Alerts
- Without a subscription, the doorbell tends to send alerts for a wide range of events, including cars passing by and the user unlocking their door.
Ring vs Nest Doorbell – Frequently Asked Questions
How to reset nest doorbell?
Heads Up: Before you factory reset your Nest doorbell, it is important to know that all your personal settings and recordings will be erased.
That being said, here’s how to reset Nest doorbell. Step 1 is to remove the mount by loosening the hex security screw on the head of the doorbell.
Next, locate the reset hole on the back of your Nest doorbell as shown in the image below.
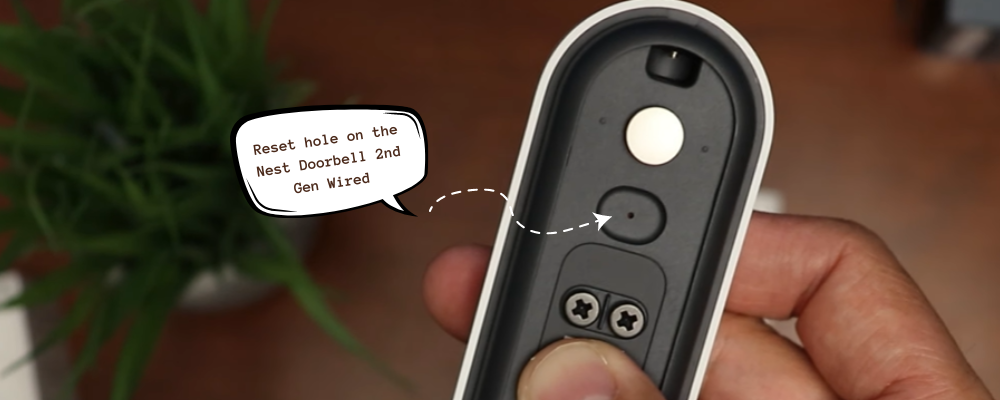
Take a SIM injection pin, a paper clip, or a thumbtack and insert it in the reset hole. Press & hold for about 10-12 seconds.
While you’re holding the pin, a white LED light will be on. Keep holding the pin until you observe the yellow LED flashing four times, along with a sound or tone. Once the yellow LED is solid, you can release the pin.
The tone indicates that your Nest doorbell is now in setup mode. To remove the doorbell from the Google Home app, simply open the app and select the doorbell.
Tap on the gear icon (doorbell settings) in the top right-hand corner. Scroll down to locate the “Remove Device” option. Tap on it and you’re golden.
How to charge google nest doorbell?

Remove the doorbell from the baseplate by using the release key tool that came in the box. Locate the slit on the head of the doorbell and insert the key inside so the doorbell pops off the baseplate.
Use the USB charging cable that came with the package and charge the Nest doorbell with the USB-C port located at the back.
How to change nest doorbell sounds?
Open the Google Home app and click on the doorbell on the main page. You’ll see the battery status of your doorbell, from there you need to click on the gear icon in the top right corner.

This will take you to the doorbell settings. In the “Device Features” menu, click on the “Doorbell” option and turn on the “Visitor Announcement” feature that will allow your Google Nest hub or the Nest Chime Puck to act as a doorbell chime.
This option is helpful as it will enable other people in the house to hear the doorbell. If you don’t enable it, the doorbell will only ring your phone.
Now, underneath the ‘announcements’ option is the Doorbell Theme where you can select any sound of your preference. Just tap on any sound you like and you’re good to go.
Does nest doorbell require a subscription?
No, a subscription isn’t required for the Nest Doorbell. You get 3 hours of event history and recording without a subscription.
However, subscribing to the Nest Aware plan for a mere $6 per month will not only unlock advanced features but also allow you to have a 24/7 recording history.
How to remove ring doorbell pro faceplate?
Look underneath the Ring Doorbell Pro and locate a screw that holds the faceplate. Use the Ring screwdriver and unscrew it, be careful with the screw as they’re easy to lose.
Then simply grab the faceplate and pull towards you. It should come right off. To put it back, snap it back on like you removed it and tighten the screw underneath and you’re golden.
How to change battery on ring doorbell pro?
Check out this amazing guide on how to change a battery on Ring Doorbell Pro by ifixit.com.
How to reset ring doorbell pro?
First, cut out the power to the doorbell. Then, remove the faceplate and locate an orange button on the right side of the doorbell. Press and hold it for 15 seconds. Release it, once you see the blue LED start flashing.
It will blink for about 15-20 seconds until it speaks to you affirming that your doorbell is in setup mode. Once you hear the confirmation, a white LED will start spinning and it will direct you to the Ring app for further instructions.
Final Verdict
In this ultimate showdown of Ring vs Nest doorbell, we’ve taken a close look at what each has to offer.
From Ring’s customizable privacy settings and dual-band wifi connectivity to Nest’s intelligent person and package detection, both doorbells bring unique strengths to the table.
Both the Ring Doorbell and Nest Doorbell have their strengths and weaknesses, making them suitable for different user preferences.
If you’re already invested in the Google ecosystem, the Nest Doorbell seamlessly integrates and offers features like face recognition and clear camera quality.
On the other hand, the Ring Doorbell’s customizable motion zones and wired power option can be enticing for users who prioritize these features.
The choice between the two ultimately depends on your existing smart home setup, specific needs, and your willingness to subscribe for additional features.
However, if you’re looking for an expert opinion on which one is the best, it would have to be the Nest doorbell in terms of value for money.
So, whether you go with Ring or Nest, you’re stepping into a smarter and safer way to answer your door.

