Knowing how to test water heater element is an important part of ensuring the safety and efficiency of your hot water supply.
Knowing how to test the elements in your water heater can help you identify any issues before they become major problems, saving you time, money and energy.
In this article, we’ll explain how to test water heater element so that you can make sure it’s working correctly.
How To Test Water Heater Element?
Two thermostats are present in electric water heaters with upper and lower heating elements. One to manage each component.
The thermostats in the tanks open and close contacts that supply power to the heating element, keeping the water at a steady temperature.
Nonetheless, here’s how to test hot water heater element:
Step 1: Turn off power
Firstly you need to turn off the power at the breaker panel. If your circuit breakers are not labelled then you need to look for a bigger breaker on the panel because electrical water heaters have a two pole breaker the size of which is bigger than the usual breaker.
Step 2: Test your Multimeter

Next thing you should do is check your multimeter to see if it’s working good especially if you have not used it for a long time.
The first thing you’ll check are the leads themselves to make sure that the wires inside are not broken or somehow defective.
The easiest way to do so is to set your meter to continuity most meters will have this feature, look for sonar looking symbol on the meter.
Then all you have to do is touch your meter leads together, if you hear a beep that means the leads are good if not, then it means the leads are bad and need to be replaced.
Readers may also like: “best thermostat for a heat pump“
Heat pump thermostats are used to regulate the temperature of the water by controlling the operation of heat pump systems, including those used for water heating.
If you don’t have the continuity feature you can also check the leads by using the ohm/resistance setting then when you touch your two leads, the meter should not say ‘ol’ (open line) or else the leads are bad.
When touching the leads you should get some kind of a reading. The resistance between the leads is super small so all you would see is zero which is fine in this case.
Next you need to check the voltmeter itself to see if it’s reading voltage properly, it’s either going to be labeled as ‘V’ or ‘ACV’ (alternating current voltage).
To check if your meter is reading proper voltage simply stick your meter leads into an outlet and you should get around 120V.
Once you’re done testing your voltmeter you can now safely proceed.
Step 3: Test the Elements

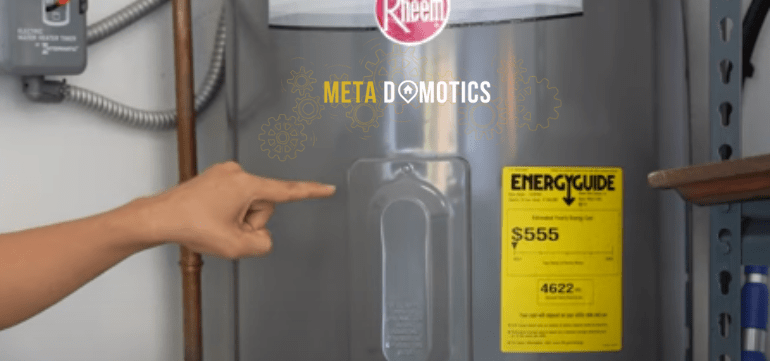
All the elements of your water heater are going to be behind these panels, your water heater might just have one or two elements. So an upper element and a lower element.
Now you’re going to take both of the panels off by unscrewing the two screws.
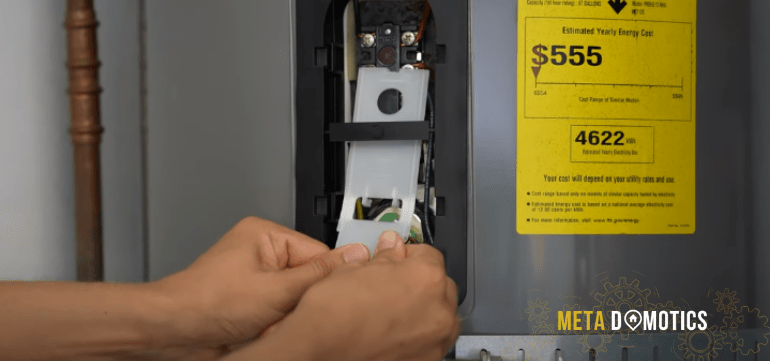
Once you have the cover off and you pulled the insulation out, the first thing you’ll see is a plastic cover that covers your element and your upper thermostat.
This cover does need to come off so just gently tug on it and it should come right off.

In this section we’re only going to talk about how to test the heating element.
Step 4: Check the Resistance of the Element

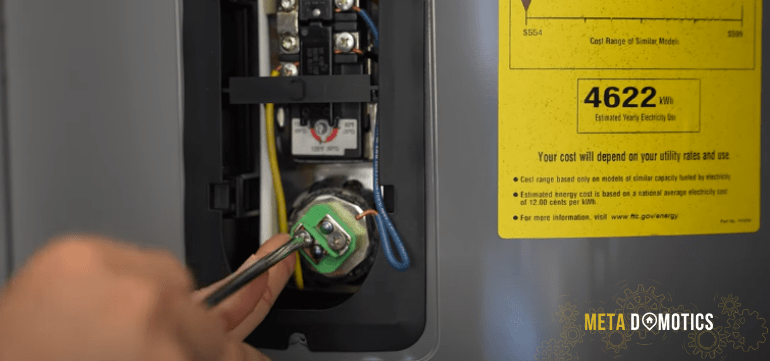
Proceed to check the resistance of your heating element. To do so simply loosen the screws that are holding the wires in and pull those wires out.
Some people say that you can check it without taking the wires off but that can give you a false reading, the right way is always to take the wires off.
When you’re testing the heating element you do not need to drain the water heat.
If the element is bad, it doesn’t matter if the water heater is drained or not you should be able to tell with the meter when you’re going to have a funky reading or it’s going to read ‘ol’ or some super high reading and it will be pretty obvious when you’re checking if the element is bad or not.
Set you meter to ohms (horseshoe symbol) and put your leads on each screw. You’re looking for reading in between a range of 12 and 20 that is an average read.
Different water heaters will have different elements, typically larger water heaters are going to have larger elements which are also going to have a larger read so some may even read 28. The most common reading are 12, 16 and 18.
The ones that go over 20 are pretty rare. Basically if you’re getting a read anywhere from 10 to 30, most likely you heating element is good.
If the reading is way lower, lets say 2 or way higher like 700 or something then your heating element needs to get replaced.
Step 5: Put the Wires Back in

After you check the resistance make sure you put the wires back in the same way you found them and tight them down nice and snug as you don’t want to have a loose connection.
A loose connection means heat, and that could start to melt the wires, so make sure you have them secured tightly.
If your electrical water heater has two elements and you want to test the other one too, the same process would apply there as well.
Note: If you checked your elements and you were getting ‘ol’, that means the element is burnt out and it’s probably broken somewhere in the middle of it.

If one of your elements is bad, with water heaters, it’s nice to replace things as a pair. So if you’re going to be replacing one of the elements, it will be a good idea to go ahead and just replace both of them, the upper and the lower element.
Same goes with the thermostats, if you checked both of your elements and they’re good, yet your water heater is still having issues. Then the first thing you should check are the temperature set points.
The upper and the lower thermostats, so if the water is not hot enough then try increasing the temperature or if the water is getting too hot then try lowering it on both the thermostats.
So if you checked your elements and they are both good, and you’ve tried adjusting the temperature settings on your thermostats yet your water heater is having issues, then the next thing you should try is to replace the water heater thermostat.
They are recommended to replace as a pair and hopefully that will solve your hot water heater problems.
Frequently Asked Questions
How to test water heater element without multimeter?
Testing a water heater element without a multimeter can be a bit tricky, as a multimeter is the most reliable tool for measuring electrical resistance.
However, don’t worry! There are a few alternative methods you can try if you don’t have a multimeter on hand. Just keep in mind that these methods may not be as precise or dependable as using a multimeter.
Approach 1: Visual Inspection
First, let’s start with a visual inspection. Take a close look at the element and check for any obvious signs of damage. Look out for things like corrosion, discoloration, or physical breakage.
If you spot any visible damage, it’s likely that the element is faulty and needs to be replaced.
Now, if you want to do a basic test for continuity, you can use a regular battery and a small flashlight bulb. Here’s how you can go about it:
-
Remove & Cut the Power
Make sure you disconnect the power supply to the water heater and ensure that it is turned off. Safety first!
Next, remove the wires from the element terminals.
-
Connect Battery to Terminals
Take one end of the battery and connect it to one terminal of the element. Then, connect the other end of the battery to one end of the flashlight bulb.
Next, connect the remaining terminal of the flashlight bulb to the other terminal of the element. If the bulb lights up, it indicates that there is continuity, which suggests that the element is functioning properly.
However, if the bulb doesn’t light up, it could indicate a possible problem with the element.
It’s important to note that this method is not as reliable as using a multimeter because it only checks for continuity and not the exact resistance of the element. But it can give you a basic idea of whether the element is working or not.
Approach 2: Temperature Test
Here’s another method you can try out:
- Turn on the water heater and let it heat the water for around 30 minutes.
- Carefully touch the water around the area where the element is installed. Be cautious not to burn yourself!
- If the water isn’t heating up or remains cold, it could be an indication of a problem with the element.
Remember, using a multimeter is always the best option for accurate testing.
If you’re unsure about testing the water heater element or suspect that there’s a fault, it’s recommended to consult a professional electrician or plumber for assistance.
What is the resistance of a water heater element?
The resistance of a water heater element can vary depending on its design and specifications. In general, good water heater elements typically have resistance values ranging from around 10 to 25 ohms.
However, it’s important to note that the exact resistance can differ based on factors such as the power rating of the element, the material used in its construction, and the voltage of the electrical supply.
Higher-wattage elements usually have lower resistance values, while lower-wattage elements tend to have higher resistance values.
To determine the specific resistance of a water heater element, it’s best to consult the manufacturer’s specifications or refer to the documentation provided with the element.
How to tell if water heater element is burned out?
If you’re wondering about your water heater, keep an eye out for a few signs.
If you suddenly lack hot water or it’s not as hot as usual, there may be an issue with the water heater element.
Another clue is if your hot water runs out too quickly. Also, watch for visible damage like scorch marks or breakage on the element.
You can test the element with a multimeter for high resistance readings, indicating a replacement is needed.
Another trick is connecting the element to a battery and a small flashlight bulb, which should light up if the element is functioning.
If you’re unsure or suspect a burned-out element, it’s best to call a professional for accurate diagnosis and necessary replacements. Better to be safe than sorry, right?
Conclusion
To wrap it up, knowing how to test water heater element is a valuable skill that can help diagnose and resolve issues with your water heater.
As we’ve discussed in this blog post, the process involves a few important steps. Begin by turning off the power and water supply to the heater.
Then, use a multimeter to test the continuity of the element. If the reading shows no continuity, it indicates a faulty element that needs replacement.
By understanding how to test water heater element, you can identify potential problems and take appropriate action.
Remember to prioritize safety throughout the process and consult a professional if needed.


Pingback: How To Replace Water Heater Thermostat? | Meta Domotics